SketchFab is a great online tool that allows you to view 3D models or buildings, sculptures, people or whatever, with you in control. Whether you model objects or photograph them, you can view and share them easily with friends, clients, consultants or contractors. For those that do not create 3D material, no need to read the tutorial below, just go to the link listed below and see all the great work that is being photographed in 3D and see what you can discover and explore. UPDATED 12/24/2022.
INTRODUCTION
Viewing a model is free, and the service is free so sign up. If you want to go ‘Pro’ it will allow you to upload models and keep them private.
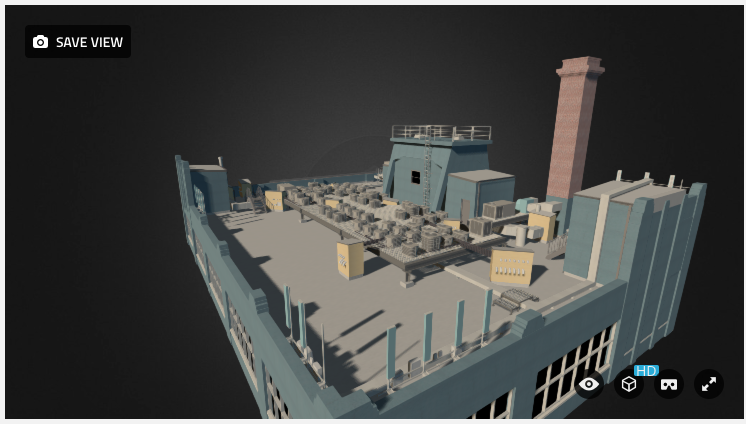
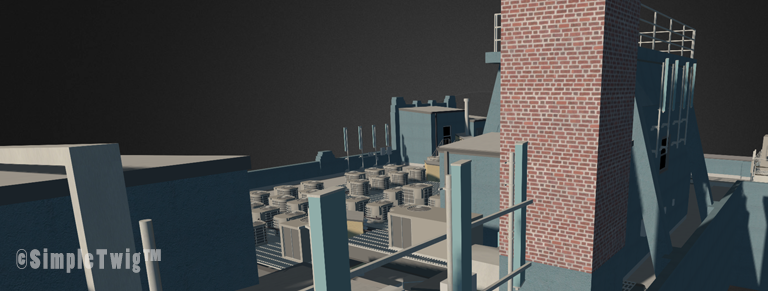
SimpleTwig example model inside of SketchFab
[sketchfab id=e40358e537354050a008009ce5f2933d]
BASIC NAVIGATION:
SketchFab has some navigation tricks. These will help you get around:
- Go to Full Screen (from computer or mobile device like an iPad).
- Rotate using Mouse, zoom in using scroll wheel,
- Double click on an object to zoom to that area of your model.
TUTORIAL
The tutorial goes over the easy to follow steps to export your 3D model from ArchiCAD and then import them into SketchFab. Using ArchiCAD, create your model and view it within ArchiCAD 3D view…
STEP 1: In ArchiCAD (using AC17):
Go to your 3D-Model view window and show the entire model you want to export. The viewpoint I use is an aerial perspective… I doubt the viewpoint matters when exporting the model.
STEP 2: Command-Option-S (File Menu > SaveAs) (Mac OS);
In the Save 3D window at the bottom left, click ‘New Folder’ and name it as you like; then,
Select Format > Wavefront File and name your file (your_title.obj)
This will open a new dialogue box called: ‘Save Wavefront Document’
Check off ‘Model **rotated**’, and I use ‘Elements – Surfaces’
Set drawing unit to ‘1.000 inches’ (after experimenting with units, between 0.001 to 50,000 inches, I don’t think it has any impact on what is imported to SketchFab with regards to background or textures scale).
Click ‘OK’.
This will take just a few short seconds to save 3 components into your computer’s folder: 3D-MODEL_Textures; 3D-MODEL.mtl and 3D-MODEL.obj.
STEP 3: When the processing from ArchiCAD is done:
Go to your finder and right click on the folder you made, and select ‘compress’ (Mac OS) to turn the folder into a Zip file; Don’t compress the individual files, just the folder that holds the files.
This will create a file named ‘your_title.zip’ which is what you will upload to your SketchFab profile (top right corner is the Upload button on the SketchFab browser page).
In SketchFab (via browser):
When uploading, you may get a message “There might be issues if you upload. Press continue to upload anyway” Click Upload. These ‘issues’ may have to do with textures that didn’t load, or weren’t assigned to an object (that you had the layer turned off and thus didn’t import). You can reassign textures, even upload new one’s from inside SketchFab.
When ready click on ‘Publish’.
UPDATE 12/24/2022: How to Reupload a new model over an existing model.
This is useful when studying a design and you want to upload a new version without saving the older version. It also helps save ‘upload file slots’ on SketchFAB because they only allow a few for non-subscribers. It will also reuse your titles, tags, settings, etc. of the original model.
STEP 1: Go to the model you want to overwrite. Click on ‘Edit Properties.’
STEP 2: On the right side, below the preview window, click on ‘Reupload.’
STEP 3: Drag and Drop your new compressed file, as indicated in the original steps above. Click ‘Reupload’ button. Note it will take a minute or two to upload, wait for it to finish uploading… during this time it will still show your original model.
STEP 4: When finished uploading, it will provide a button to ‘Check Model.’ Click. It will then ask you if you want to keep the old model, or ‘Choose Reuploaded Model.’ Click, and that’s it.
TROUBLE SHOOTING
Possible Issues:
- 1) Orientation: Your model may be imported in the wrong orientation which is easy to fix, just click ‘Edit 3D Settings’ inside SketchFab and in the edit window on the left > Straighten Model click on the ‘x’ arrow to rotate, and ‘Save View, then Save Settings’.
- 2) Pivot Point: Double click on the part of the model you want as the pivot, click ‘Save View’ and ‘Save Settings’.
- 3) Background: Because the ArchiCAD model imports always seems tiny next to the default backgrounds I use a blank background. Go to ‘Edit 3D Settings’ > Lighting > turn off ‘Environment’ and turn on ‘Lights’. Changing the scale of the export seems to have no effect.
- 4) Textures: As for the texture, it’s best to upload power of two texture, so for example, instead of 2156×1856, 2048×2048 would be better (or 2048×1024, etc…).
However, doing that will not fix your problem though (it’s just that you don’t do it we are going to resize it to 2048×1024 so you might loose precision, usually not that big of a deal though)
Good luck.
SHARE!
Tutorial by SimpleTwig.com. Original content copyright simpletwig™ 2016
Feel free to share and link directly to this page. Thanks.
You can find our models on our page here: https://sketchfab.com/simpletwig
Please comment if you find this article to be useful, or share!
WORDPRESS TUTORIAL
WordPress Blog Writers:
For those who want to add a model directly to your WordPress blog, check out this handy plugin: https://forum.sketchfab.com/t/wordpress-plugin-we-made-a-wordpress-plugin-that-sketchfab-blog/534
You will need your model’s ID:
To find the ID of your model you want inserted into WordPress, which should look like this e40358e537354050a008009ce5f2933d, simply click on the ‘Get Embed Code’ of your model and find your ID within the code. Then paste this ID (in this example 31 consecutive letters/numbers) where it is requested.
I have the same result that Sara A:
Object whitout materials
I believe the problem is that I don’t know how to create two files :
3D-MODEL_Textures; 3D-MODEL.mtl
Please can you explain how to obtain these two files from archicad
Thanks
Did you export from ArchiCAD and end up with these 3 files? 3D-MODEL_Textures; 3D-MODEL.mtl and 3D-MODEL.obj
Then, did you zip the folder and not the individual files before importing them to SketchFab?
Other than that suggestion I don’t know if I can help you any more. Good luck.
Hi!
Thank you for the tutorial.
I have followed the steps But the model has been uploaded as one object and without any materials. When clicking on one object the whole model is highlighted. Do you know anything about this problem?
You’re using ArchiCAD and exporting as noted? If you miss something in the export it won’t work. Or maybe, in Sketchfab you just don’t know how to select the individual materials. I believe it is a drop down menu.
In SketchFab edit mode, click Materials tab (top left column), just below this tab is the drop-down menu, just select the material you want to edit. The materials have the same name as Surfaces in ArchiCAD. Note that I am not clicking on the model to ‘select’ a portion of it, but the selection is automatic under the Materials tab. hope this helps and thanks for finding my tutorial.